Pages

Thursday, February 27, 2014

IRIS FOLDED HEART

I am sharing an Iris Folded heart with a tutorial!  I love Iris Folding and origami paper is perfect for this!  It is thin and easily folded.  Because it is thin you don't get a lot of bulk which is Awesome!!

Supplies:
Ivory Cardstock
Kraft Cardstock
Red Marker

Use a craft knife to cut a heart out of the center of  the Ivory Cardstock.  Cut some kraft cardstock and fold it in half to make a card base.  Leave enough space around the heart so it will fit nicely on the card you just made.

I like to sketch my design before I start.  On the left I just wrote where the 3 colors of paper will go and in which direction.  I call this a swirl pattern.  On the right, I made a pattern that I could use to make a more interesting design.  I did the swirl pattern for my heart.  Take your paper and cut it into 1 inch strips. Now, fold them in half.  The center of the design will be empty.  With either of these designs, there will be a triangle in the center.


Now, get your tape ready!  I start with my first 2 pieces of each color.  I start the pattern by placing them at different angles around the heart.  Tape the first one, and then place the second strip on top at an angle and tape it.  I don't do precise measuring.  Just each piece a little over the last, going clockwise.  Be sure to keep your folded edge towards the center.  Each section is at a different angle.  And each piece overlaps the last.  Keep going around in a circle.


This is the back.  I just keep adding pieces on top of the last.  Be sure to not show the edges and be sure the heart doesn't have any open areas.


Here is the front.  Keep checking the front as you tape another circle.  If there is a problem, you can fix it before it is too late!


The back looks like a hot mess!  But don't worry!  The front is the magic!!  I tape all around the edges of the design, just to make sure it is tight all around.  And when you turn it over, you get....


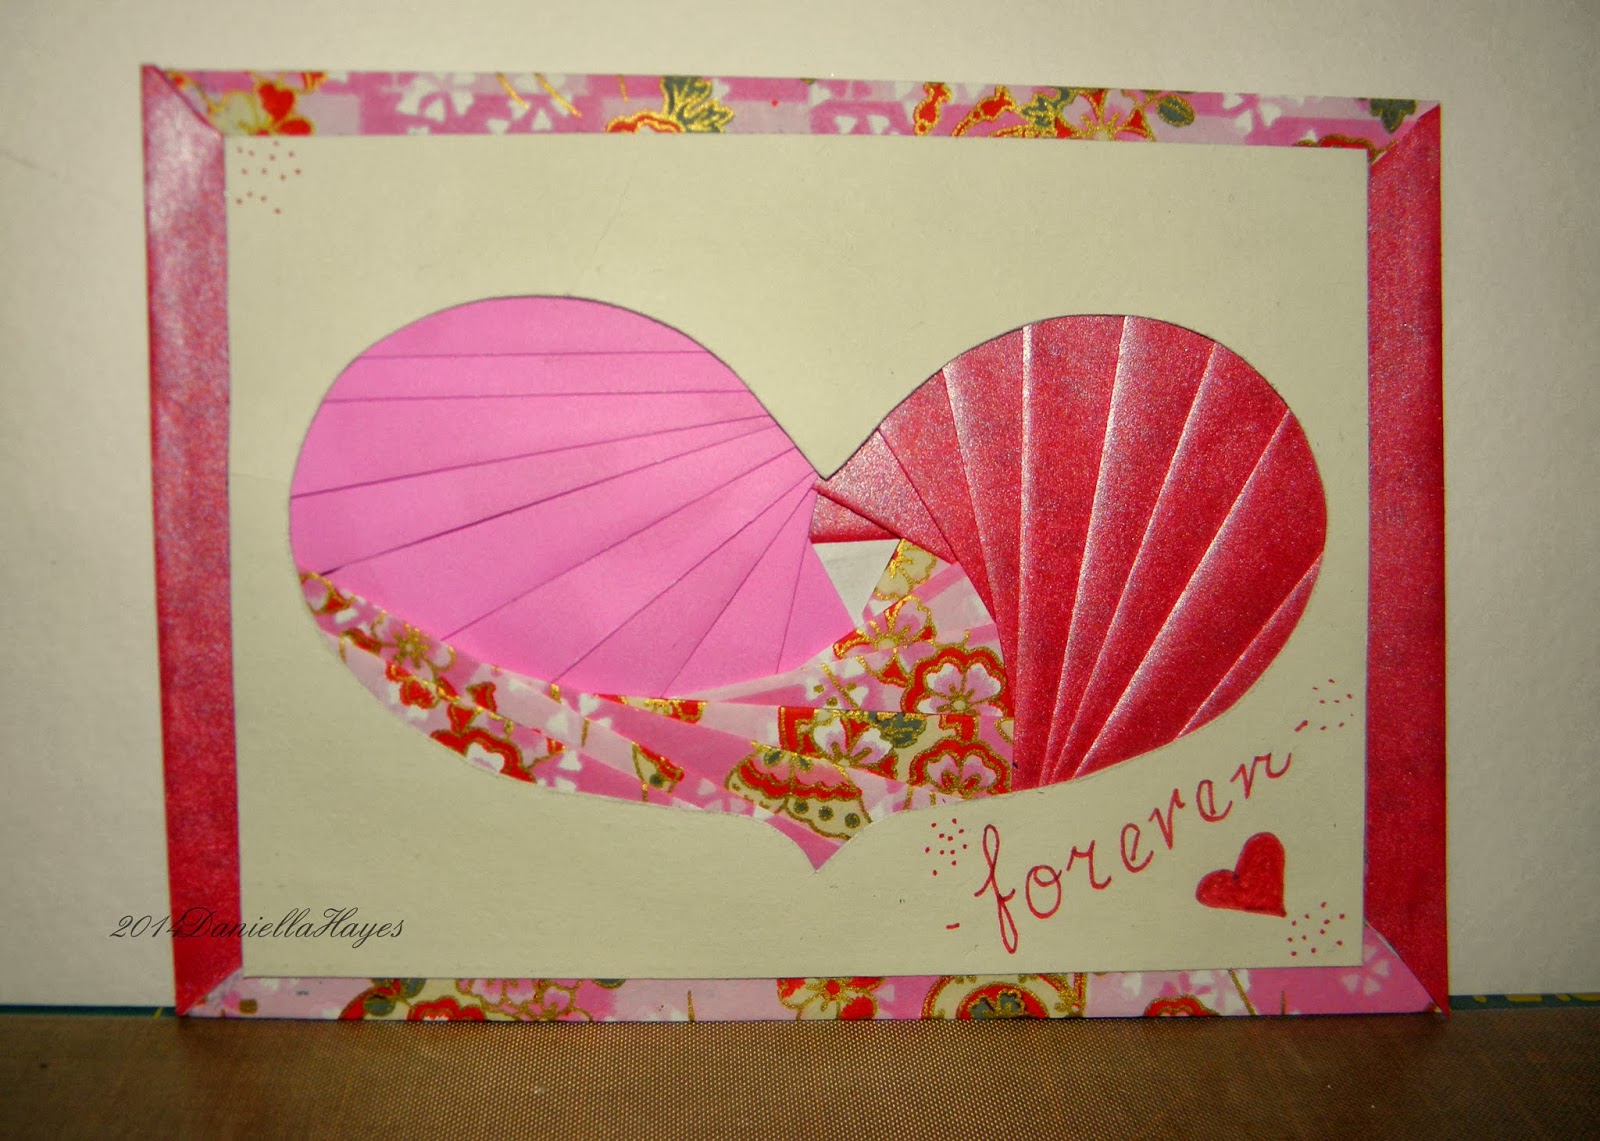
Magic!!  I take the left over strips and made them a border on the card.  I also used a bit of white paper for the center, since the card base is kraft.  You can ink the outside, or stamp.  Use pastels or watercolors!  I just wrote the word "forever" and made a heart.  I think my Iris Folded heart came out perfect and I didn't want to take away from that.

That's it!  Try Iris Folding for yourself!  It is much easier than you think!  If you do try Iris Folding please tell me, I'd love to see it!!  You can leave me a comment, or find me on Facebook.  Click the badge on my sidebar!


Tuesday, February 25, 2014

WOYWW

Welcome to my desk!  If you are here, you must have come from Julia's blog.  She is the Queen of WOYWW!

First, I want to show you the Iris Folded Heart I made for Niji/Yasutomo Company.  I did a whole tutorial on Iris Folding without a pattern on the Niji Blog.  I'd love it if you checked it out!!


Here is my desk.  Not to messy.  The Iris Folding is not a messy technique.  The reverse side looks like a mess, but the process isn't too messy.  My tape is out (of course) and my scissors.  The patterns I drew to come up with my design and my white eraser!  Pretty tidy this week.


Thanks for visiting me this week!  Next week I will be having a giveaway!!  It is awesome, I can't wait!!

JOURNAL 52

I have been following this awesome group on Facebook, Journal 52.  It is like many Art Journal groups, they give a prompt, and we run with it.  A prompt a week for a year.

I only finished week 3 so far (they are on week 8) but I hope to jump into week 8 and keep up.  Although we all know it won't last, or I will miss a bunch of weeks again. :(  

But I'm not complaining!!  I am sticking to my word for the year, SIMPLIFY, and if a prompt or page is not in my schedule  for the week, I'm not worrying.  I will keep plugging along, with less stress and demands on my self.  So will I do week 8 this week?  Not sure yet.  There's always next week, right?

I challenged myself with this page.  Not because of the prompt (which was "You Make Me Smile"), but because I only used paper and a few markers.  Most of my pages include paints, inks, paper pieces, stamps, stencils..... 

I made some designs and wrote the words, and doodled inside the words and added glitter markers.  But no matter what I did, it felt unfinished.  So, I outlined stuff and added more doodles and still, it felt unfinished.  Finally, I gave in....I sprayed it with ink, and circled all the big drops I found.  

I am very pleased with this page overall.  It was a challenge for sure!


Tuesday, February 18, 2014

WOYWW AND MY WINNER!!

If you are here, you are awesome!!  AND, you must be here from Julia's blog!  She is the founder of the WOYWW!

First the desk
I just finished some things that I can't show yet.  So what is left is a messy desk with tools, gauze, ribbon pieces and spray ink left out.  Tomorrow I will clean it up, after I visit all of you!

AND.....The WINNER of my Origami Paper Giveaway is....

Sandy Leigh of Eat Write Dream Stitch!!  WOOOOO HOOOOO!!
Congratulations!!

Email me (drhayes1770 at yahoo dot com) with your address, I will send it to Niji/Yasutomo and they will send it off to you!!

Thank you so much for visiting!!  And thank you to all my new "Followers" FRIENDS!!  I already have 2 giveaways coming soon!!  The more friends, the more free stuff  PRIZES I can get from awesome companies!!

Enjoy the party!!

Tuesday, February 11, 2014

WOYWW I'M BACK!! AND A GIVEAWAY!!

Oh my heck!  I am soooo happy to be here this week!  I've been gone far too long!!  If you don't now what I'm talking about, check out Julia's blog.  She has all the info. She is also AWESOME!!!

First, the giveaway!!
I have the privilege of working for Niji/Yasutomo Company and they are letting me giveaway a pack of our fancy Yuzen Origami Paper!  Leave me a comment here and next week I will announce the winner!  We would LOVE it if you would "Like" the company Facebook page HERE, and becoming a follower of my blog would be awesome!!  With more people following the blog, I can get more sponsors to have more giveaways!  I already have another one coming up in a couple weeks!!  Giveaways are FUN!  I love them!!

Now, here is my desk.

Not much to see.  Some watercolor paper on the left.  Some zipper ribbon that I'm trying to make roses with and some Yuzen Origami paper of my own.

Enjoy the party!!  And thank you for visiting me!!

NOT A RED VALENTINE

I loved the name of this collage sheet from Altered Pages.com!  Altered Pages and Niji Yasutomo Co. are cross promoting this month.  I made my "Not A Red Valentine" using both company's products.

Altered Pages Collage sheet AP2055 "Not A Red Valentine"
Strathmore Mixed Media Paper
Yasutomo Nori Paste
Craft Smart Paint Pen
Baby oil
Random Bits and Pieces: gauze, flowers, leaves, numbers, pearls

Gather your supplies.

Use the white oil pastel to draw words, flowers and hearts.  Scribble over them with multiple colors of oil pastels.  Use baby oil on a paper towel to blend the oil pastels.

The colors blend wonderfully!  But, the white under them stays so you have these fun designs left.  Score the paper into an accordion shape.

Trace over the designs with a Permawriter.

Add some dots and doodles, apply the collage sheet image and other embellishments using Nori Paste.  I like the look of my Valentine.  It's fun to use a different color for a change.

Monday, February 3, 2014

ALTERED RAT TRAP

Altering Rat Traps is so fun!  I made this one for Altered Arts Magazine.  Did you know we have a BLOG now?  I hope you will check it out!!
I started by removing the metal from the wood base of the Rat Trap.   I sanded the wood and adhered text paper to it.  I used Ranger Ink's "Perfect Pearls" to make a faux patina on the metal.  I attached the Rat Trap to a mini hanger from Melissa Frances.  The resin flower on the lower left and the clothes pins on the top right are from her too.  
Some other Ranger products I used are: Pins, A Bottle, Pen Nib, Baubles, Sprocket and Stamps.  The flowers and Inks are from Prima.

Canvas Corp. twine made the bow, and I used some of their burlap on my Trap too.  A miscellaneous key and gauze finished it up!

I would love to see your Altered Rat Traps!  Just leave a link and I'll be sure to check it out!  If you've never altered a Rat Trap, give it a try!  They are a fun and inexpensive way to use up your scraps!